
When my son was about 2 months old, I made him a fleece blanket in preparation for a cold winter. Little did I know, my daughter who is a very girly girl claimed it as her own but as the weather recently has gotten colder and colder I promised her that I would make her a blanket of her own. I was given two instructions by her 1) it had to be red and 2) it had to be cosy and soft.
With my son’s blanket, the fleecing that I used already had planes and helicopters on it and was very boyish however the only fleecing at my local fabric shop for girls was just very pink and flowery and not at all what I had been instructed to come home with. So I decided on a plain red fleecing on which i would appliqué some images to personalise the blanket.
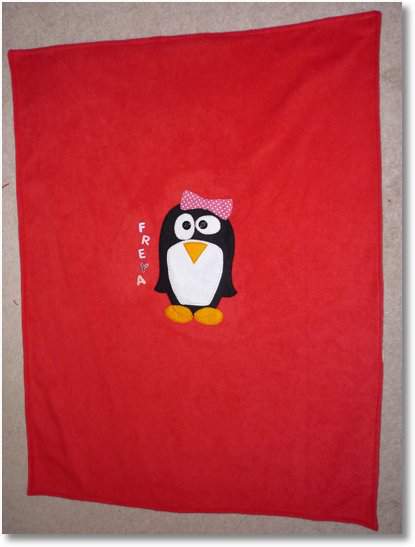
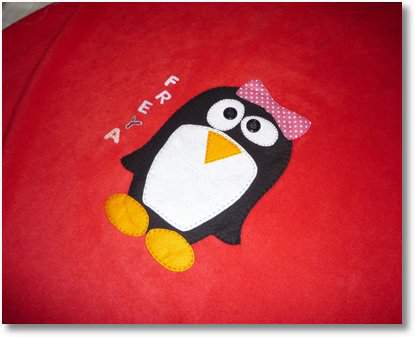
Freya loves penguins so I decided that was going to be the theme for her blanket and here it is;
I decided to have a go at a tutorial on how I made it (this is my first so forgive me if it could be better).
Firstly I sketched out a few ideas as to how i wanted the penguin to look using cartoon images from the internet for inspiration. I decided on the look then sketched it freehand onto a piece of A3 paper. Once i had got the sizing as i wanted it, i then traced each layer of the penguins features (body, tummy, feet, eyes, beak and bow) separately onto Bondaweb ensuring the image was reversed so that the finished image would turn out the same way round as i had sketched it.
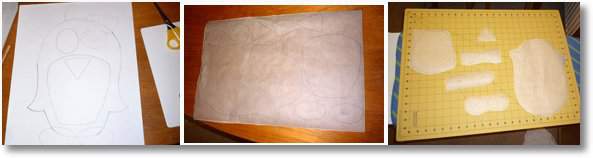
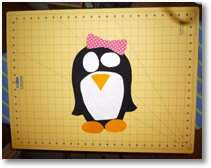
I used felt for the penguins body, tummy, eyes, beak and feet. Iron the bondaweb pieces onto the felt (it is not essential to choose the wrong side as with felt there is no right or wrong side) then cut out each piece and layer it on a flat surface to make sure you are happy with the look.
Next cut the fleece fabric to the size of blanket you want to make. I didn’t measure mine accurately. I bought one metre of 150cm wide red fleecing and cut the width down until the size looked about right. Feel free to be more accurate though. I used cream coloured winceyette for the backing to my blanket.

Starting with the bottom layer of your appliqué image and iron your layers onto your blanket top fabric, one piece at a time. For the penguin I did the black body first then the tummy, eyes then beak, feet and bow.
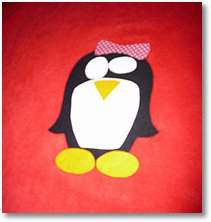
Now your pieces are in place on your fabric it is up to you how you finish off the look. I blanket stitched around the eyes first however through the two layers of felt and fleecing it was hard work keeping the stitching looking even and neat so for around the tummy, beak, feet, bow and body I did a running stitch in black thread which actually looked really professional and finished off the look of the penguin a treat. I added iron on appliqué letters spelling my daughters name to accompany the penguin and stitched on two black buttons for it’s eyes. These were bought from a local craft and hobby suppliers.
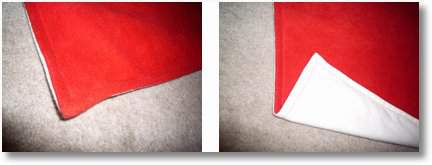
When you are happy that you have done all embellishment to your blanket front, lay it out right side facing up then lay your bottom layer of fabric, right side down on top. Pin the layers together around the edges, leaving an approx 6 inch gap to turn the blanket through. Sew around the four sides, cut the corners and turn the blanket through the gap pressing the edges flat.
To finish off the blanket and stitch up the gap, sew around the blanket again with a coordinating thread approx 1cm in from the edge of the blanket. This gives the blanket a sturdy edge and ensures your layers are secure.
My blanket was an instant hit with my daughter so I am very pleased with my efforts. I hope you can take some inspiration from this and happy sewing your own winter blankets!


tres joli mais je ne comprend pas se qu’il faut pour faire ces transferts.Merci pour de meilleures explications.Cordialement