
Hello! It’s been a bit quiet around here lately. My husband had this week off work so we went camping for a few nights in West Bay in Dorset. Going camping the same weekend as Glastonbury festival is not normally a very wise move but we were really lucky with the weather and had a lovely time away. This weekend we had the hottest day of the year so far, I’m just hoping the sun will hang around for a while.
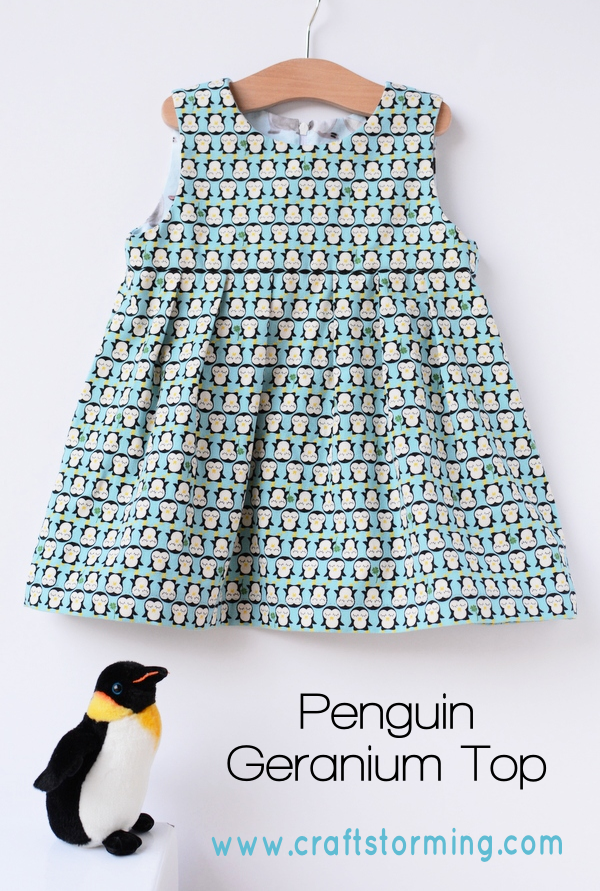
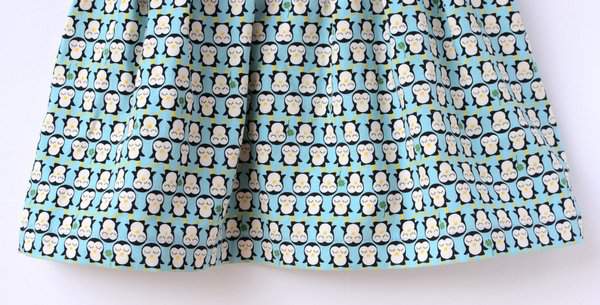
After my last foray into sewing for girls I surprised myself by wanting to try more. The Roly Poly I made was a birthday gift for my cousin’s daughter Ella and with her younger sister Millie’s birthday fast approaching I couldn’t resist trying the Geranium dress pattern from Made by Rae. I’ve seen so many versions of this and love the style of it. There are so many different options that it took me a while to choose. I knew I wanted a pleated skirt but did I want flutter sleeves, cap sleeves or sleeves? Should I have a notch in the neckline and would a dress or a top be better? Can you tell that I’m not very decisive? I spent some time looking through the Geranium Flickr pool and finally settled on a sleeveless top without a notch and a pleated skirt with side-seam pockets.
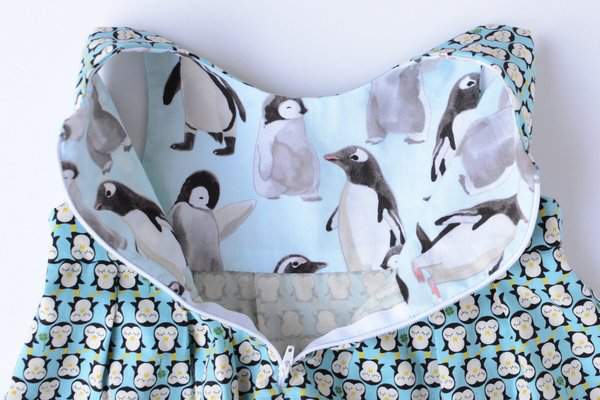
Choosing the fabric was very easy this time. Millie is obsessed with penguins and loves blue. While browsing The Eternal Maker‘s website I found this lovely Kokka print. I already had a different Michael Miller penguin print to use for the bodice lining. Based on the measurements I made it in a 4T for a small 5 year old. I could even have used the 3T but thought it was worth leaving room to grow.

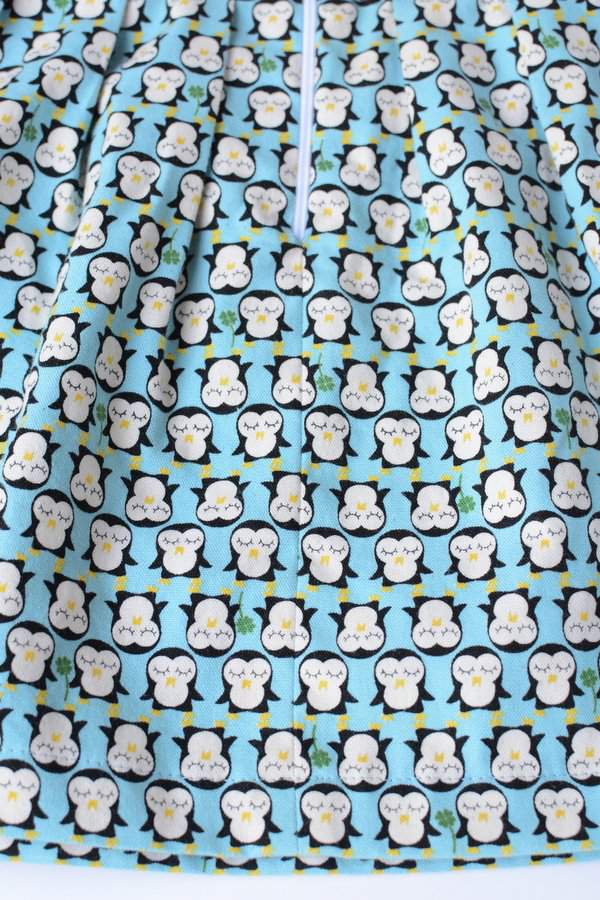
I think this will be the last small regular repeat that I use for clothing for a while. I can’t stop myself from trying to pattern match everything. The print was slightly irregular and seemed to be a bit off grain so it took a long time to get it right. Choosing a solid would have made the cutting so much quicker. Having said that I do love the finished result and I managed to (mostly) rejoin the penguins along the bottom of the back seam.
I also hand sewed the bottom of the bodice as this gives a much neater look inside.
I recommend reading the pattern through fully BEFORE you start sewing. You should do that with all patterns but it’s especially important here as the seam allowances change depending on whether it’s the bodice section or the skirt. The pattern is very straightforward and well explained, just like I’ve come to expect from Rae’s patterns. I did change the closure in the back as I’ve really liked some of those I’ve seen with zips instead of buttons.
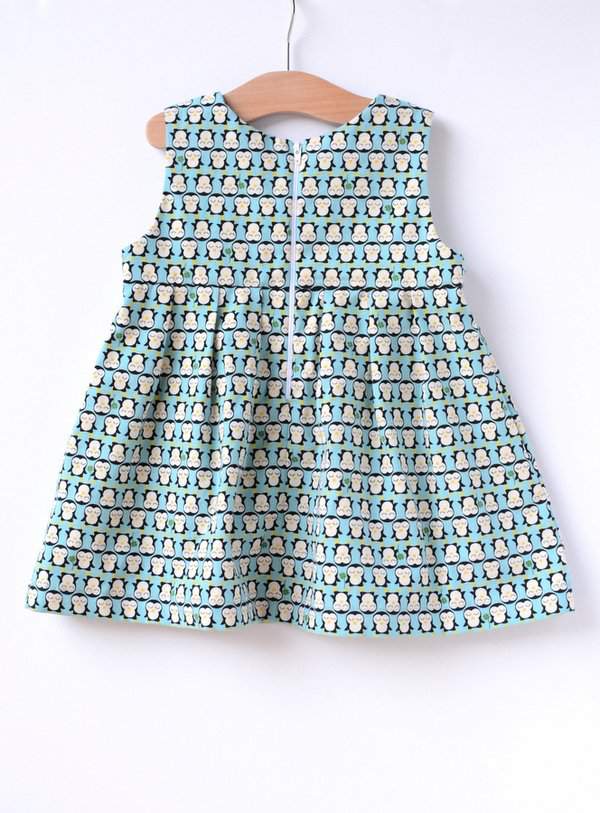
I used this tutorial from Groovybaby and Mama, although I was a bit confused how to sew the second side of the zip so I took a couple of quick pictures when I did it. The photo on the left shows the position of zip sewn onto the left back of the dress and is also shown in Trine’s tutorial. The photo on the right is how I placed the other side before sewing. The bottom section of the zip is now tucked into the inside and the zip is twisted so the teeth are on the right. I always use wondertape instead of pins to keep zips in place. In these pictures you are just sewing the outside bodice and not the lining – Trine’s tutorial then shows you how to sew on the lining. She has also made several gorgeous Geranium dresses so her blog is a great place to look for inspiration.
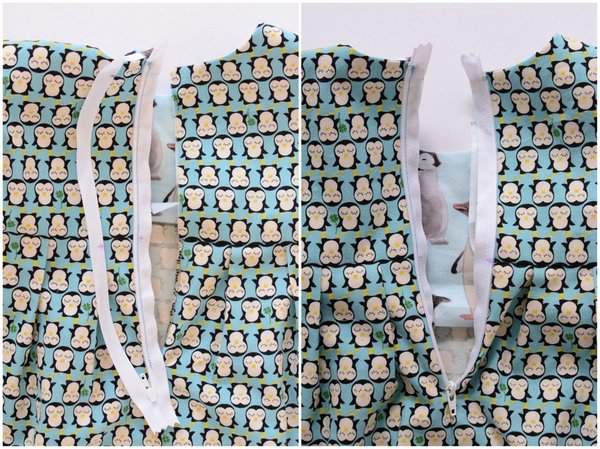
Next time I’d make sure to get an invisible zip in time but I’m still pleased with this one. I also added a bit of extra length so the hem finished with whole penguins that were the right way up.
Overall I’m really happy with this dress and can’t wait to give it to Millie. If you were put off because the pattern only went up to 5 then you’ll be pleased to know that Rae just released the Geranium pattern in bigger sizes, from 6 up to age 12. I would love to make more of these but think next time I should make a Washi dress for myself instead. I bought the pattern and fabric for one a long time ago and it should go a bit quicker now I’ve made a Geranium. First though I have a Lady Skater Dress to make as I’m joining the pattern tour later this week.
Disclaimer: Rae generously provided this pattern for me but all opinions are my own.


17 Comments
I love it! The seam line at the bodice almost looks like piping the way the penguins heads line up. Definitely worth the effort to match up the pattern.
I like that idea. It probably would have looked good with some actual black piping there.
This penguin dress is so cute and fun! It turned out really great! I bet she loved it!
I can’t wait to see your lady skater dress!
Thanks Heather – she hasn’t seen it yet so fingers crossed! I can’t wait to see my lady skater dress either 😉
I love it! The penguins are soo cute. It is nice to sew for little girls sometimes isn’t it 🙂
Isn’t it? I’m quite enjoying the variety.
This is so cute! I do love this pattern. 🙂 I want to try it with a zip! I love the look of the buttons, but the placket pooches out below it a little bit. A zipper would solve this! And I completely agree – some of the seam allowance changes, etc., were lost on me when I made my first version because I was skimming the directions a bit too much and missing the details. Well done! Can’t wait to see your Washi!
It’s such a lovely style. The zip isn’t too hard and does avoid that overlap, but I do like buttons in the back too. I keep putting off making for me but maybe the the lady skater will solve that.
Lovely. I don’t know about little girls but I think I need a dress made out of those penguins!!
You should make one Cara! It really is lovely fabric and so so soft.
Laura I wish I was as fastidious with my finishing as you are! I often just don’t think about matching prints at seams, then when I’ve finished I think – oh yeah…should have cut that differently!
The dress is gorgeous and that fabric!! I’ve never seen it before but I’ll be paying attention to see if it pops up anywhere I shop 😉
Thanks Ros! I think it’s worth it but I drive myself a bit crazy doing it so might save it for the odd special garment 🙂 I haven’t seen the fabric anywhere else yet. There are hippos and elephants too.
well that’s completely adorable! i love the zip back, too. and the penguin-on-penguin action! so sweet!
I’m actually in awe of your precise finishing. Can’t believe you managed to get them lined up horizontally *and* vertically! That’s seriously impressive.
You are crazy! In a good way of course 🙂 All the details are incredible! I wish I had an ounce of your patience and attention to details. I LOVE all the close up photos and the lining is so cute. If you ever need to sew something for a girl, I have a daughter you know! 😉 I could keep on going… I’ll just add that this dress is perfection!
I love this! So cute.
This is freaking adorable! And I love those Kokka penguins. Jane would love it. She calls them preggins.