
I am a relative newcomer to blogs. The first blog I discovered was Bakerella after my husband showed me these amazing Sesame Street cake pops. I thought they were so cute and was really impressed by how simple yet effective the decoration was. I’ve had vague plans to make some ever since and bought her book as soon as it came out. Both the book and site are highly recommended and will give you lots of ideas.
It’s taken a lot longer than I thought it would but I finally got around to making some cake pops. Casper is a huge fan of Peppa Pig so that was the obvious choice. With his third birthday approaching I decided to make some for his party. As you can see he was very pleased with them and eager to help with the photos.
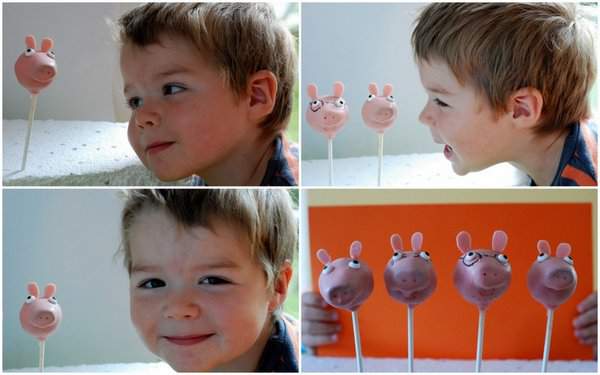
Casper helping with the photos
I thought it was worth talking through the stages I took to make these but I mostly followed the instructions from Bakerella.
You will also need a few supplies if you want to make some. I picked up a lot of it from Hobbycraft but candy melts are really popular and sell out quickly so it’s worth planning well in advance.
- Polystyrene foam (this is a lot, but was the cheapest way to get it. I only used about a tenth of it)
- Lollipop sticks (15cm ones work well)
-
Candy melts (these are not proper chocolate so don’t need tempering and set really quickly)
-
Candy eyes (I got these from Hobbycraft for £2.50 but can’t find them on their site. For a cheaper option you could pipe royal icing instead or if you can find little while circular sprinkles these would work too)
-
Edible ink pens (to be honest the ones I used didn’t work well at all, but I think some brands are better than others)
Once you’ve got everything you need you can start…
Make the cake and icing – do this first as you need to let the cake cool completely before you can crumble it. I made a chocolate sponge cake and chocolate butter icing. I used standard victoria sponge ratios for the cake (substituting cocoa powder for some of the flour). I did add a bit more flour/cocoa though to make the cake a bit firmer and easier to crumble. I also made sure it was completely cooked through.
Crumble the cake – I left the cake to cool completely and found it crumbled really easily between my fingers.
Mix in the icing – you want to use just the right amount of icing so the mix comes together but without making it too moist. I’d guess that I used about 200g of icing for a 3 egg cake mix. Press it together with the back of a large spoon.
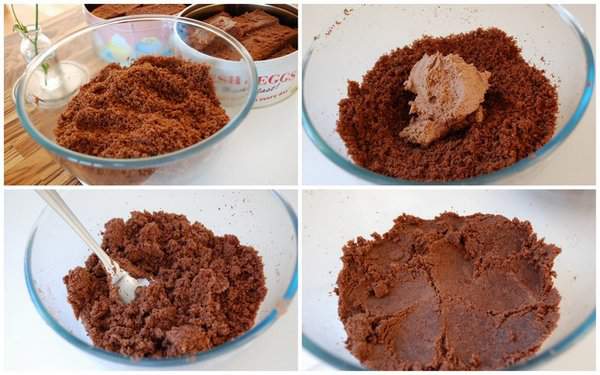
Crumble the cake, add icing and mix
Make the mix into balls – roll balls of mix and refrigerate for a few hours (or put in the freezer for about 15 minutes). I actually weighed my balls as I made them to keep sizes consistent. I used 38g for Daddy and Mummy Pig and 32g for Peppa and George. I think they are a good size but the larger ones were maybe a bit too heavy for dipping.
Shape and refrigerate again – I actually found moulding the balls into pig shapes the most time consuming stage so you’d make things a lot quicker if you choose a character with a round head. Do a few at a time keeping the others in the fridge. You need to refrigerate them again once you’ve finished
Make ears – I just melted some of the pink candy melts and piped out some ears. I did a few different sizes as I wasn’t quite sure what size the heads would be and I also wanted to do the whole of Peppa’s family.
Put the lollipop sticks in – this is much more successful if the cake ball is very cold so be patient. Dip the top of the stick in some melted candy melts and push about half way into the cake ball.
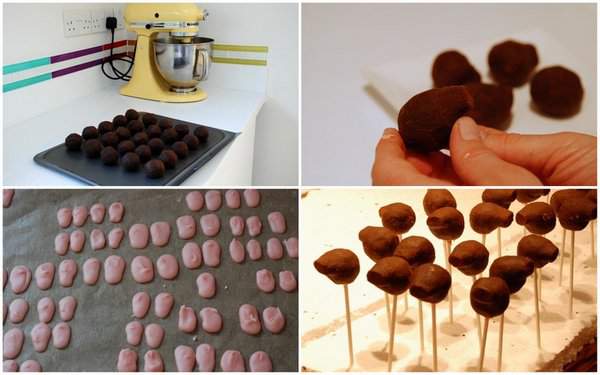
Roll, shape, pipe ears and insert lollipop sticks
Dip the cake pops – this bit wasn’t quite as successful as I’d hoped. The candy melts seemed a bit too thick. I tried to thin them with vegetable shortening but it didn’t mix in very well so on some of the dipped cake pops there was a separating effect. To be honest I wasn’t sure I wanted to continue but once you add the other details they will look a lot better.
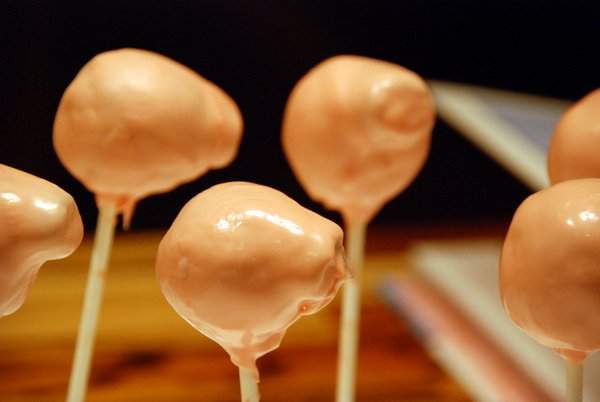
Dip in candy melts
Decorate – add eyes and ears by dabbing a bit of melted candy melts on and holding until they are secure. Use edible ink pens, writing icing or royal icing to add other features.
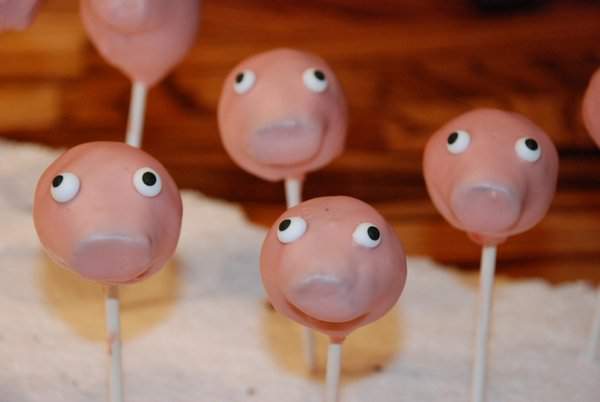
Already looking better after adding the eyes
And now for the family portrait
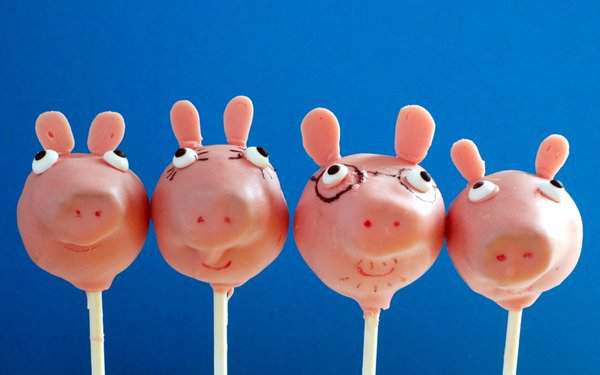
Peppa, Mummy, Daddy and George
Overall I was really pleased with how they turned out and would definitely make them again. They also complemented Casper’s birthday cake perfectly, which was made by my talented mum.
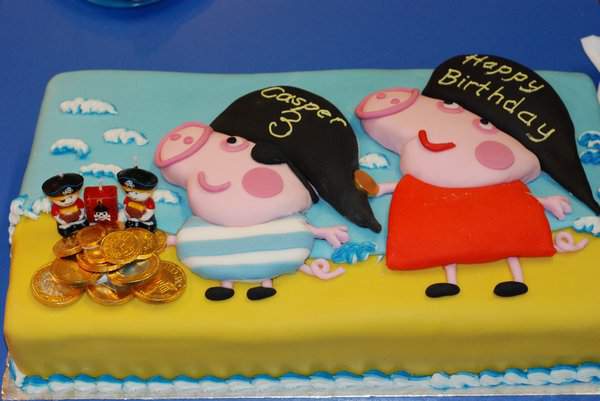
Casper’s Peppa and George pirate birthday cake


they’re great!!! sooooo having a go 🙂 xxx
love your peppa pig cake how did your mum make it?
Thanks Audz, I will ask my mum to post a reply to your question.
Hi Audz
I used a technique called bass relief to make the Peppa and George figures.
Start by finding a picture you want to use and enlarge to the desired size.
Using the smooth side up of rice paper, trace the outline with a food colour pen.
Cut out the shape and stick onto the sugarpaste covered cake with piping gel, brush the top surface with more piping gel as it helps to protect the rice paper and is then already sticky for the figures as you build them.
Look at the picture and working with the background first build the design up For example I made the legs and arms first, then the bodies, then the heads and lastly the hats. this gives a realistic 3D image.
Using the original picture as a guide use a piece of sugarpaste to make a shape to almost fill the body part you have chosen and make it slightly rounded and smooth. You do not need to colour this part of the icing. Then colour some icing the correct colour using food colour paste and knead in a little Tylo Powder. This makes the icing stronger and able to be rolled out very thinly . Alternatively you can use flower paste. Now roll it very thinly and large enough to cover the shape you have made and tuck underneath,using a little boiled water or alcohol to stick it on.gently smooth with your finger and stick it in place on the rice paper.I find a small pair of scissors useful to trim the excess icing.
Gradually build the picture in the same way. This is a long winded method of modelling, but gives a very smooth finish. The limbs were simply made with icing rolled into sausages and stuck on. You need to make them slightly too long so that the bodies and feet will cover the ends neatly.
By making the figures this way you don’t have to colour so much icing which was very useful with the pirate hats.
Lastly I coloured some royal icing blue, put that down one side of a piping bag with a large star nozzle and some white icing down the other side. I then piped shells around the base and on the cake to represent waves of the sea.
All I can say is WOW. I’ve been trawling through the internet looking for inspiration to bake a Peppa Pig cake and yours is the best I have seen. You have amazing talent. I love baking and always make my kids birthday cakes from scratch but I don’t think I’d be able to pull off anything as beautiful as your cake. Thank you for the inspiration 🙂
thanks for that appreciate it will get baking