
Hello everyone, I am really happy to hear that so many of you plan to join the Skinny Jeans Sew Along and use the free 2T pattern. I have decided to add a fun incentive as well – at the end of the Sew Along I will set up a link party for you to add photos of your Skinny Jeans. I will leave it up until the end of August to give everyone a chance to finish. The person who sews my favourite pair will then receive a copy of the full ‘Small Fry Skinny Jeans’ pattern when it is available. It is possible to link up photos from Flickr (where you can set up a free account easily) so you don’t need to have a blog to join in.
You might be wondering why I’m posting today when the Sew Along is scheduled to start on Monday. Well, someone suggested that it would be better to have the pattern a bit sooner to give people a chance to prepare over the weekend. I thought that sounded like a great idea so I’ve decided to share it with you today and also go through some of the preparation.
You can download the Small Fry Skinny Jeans for free in size 2T only here. You will need to set up an account on my pattern site, Titchy Threads. This is really quick and easy – you just need to input your email and a password, then you can choose to receive an email when the full pattern is available. Instructions for printing and assembling the pattern are included in the pattern download.
* This pattern is for personal use only. Do not copy or redistribute the pattern pieces or tutorial, instead direct people to my blog.
SUPPLIES
I talked a bit about fabric and other notions that are required in this post so hopefully you’ve got everything you need. Unfortunately I did forget to mention a couple of things.
1. Interfacing – you will need a small amount of medium weight iron on interfacing for the waistband facing, the fly guard and the fly facings. The interfacing for the fly guard and fly facings is marked on the pattern pieces with grey shading.
2. A fabric marker – a water soluble pen or tailor’s chalk. Always test on a scrap before using on your pattern pieces.
Optional extras:
- Topstitching thread
- Wondertape, a water soluble double sided adhesive tape (recommended)
CUTTING INSTRUCTIONS
I recommend always prewashing, drying and pressing your fabric before cutting. You should fold your main fabric in half (so the selvedges meet) to cut the front legs, back legs, back yokes and pockets.
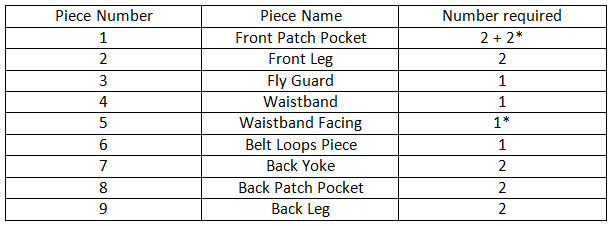
All of the pattern pieces you need to cut out are shown in the picture below…
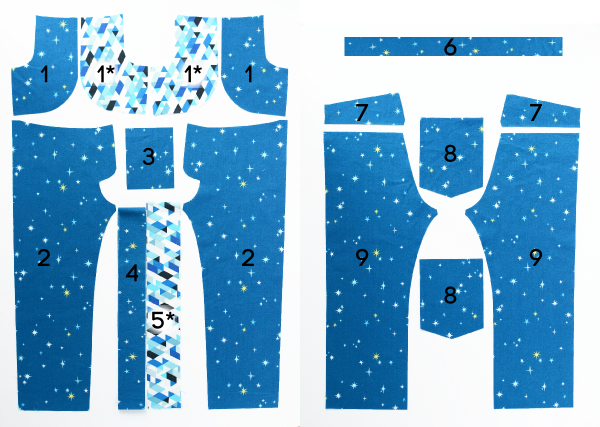
* The star indicates that the pieces can be cut in a contrast lining, if desired.
Interface the pieces below where required – this is indicated by the shading on the pattern pieces:
- Fly facings on front leg
- Fly guard
- Waistband facing
Transfer the pattern markings (using water soluble pen or tailor’s chalk) as follows:
- Front leg line A – mark onto the wrong side of the right leg only**
- Front leg line B and dot – mark onto the wrong side of the right leg only
- Front leg fly stitching – mark to the right side of the left leg only**
- Front leg pocket markings – add to the right side of the fabric for both legs
- Back leg pocket markings – add to the right side of the fabric for both legs
** Mark on the opposite leg if sewing for girls.
That is everything for today. Do let me know in the comments if you have any questions. I will return on Monday to commence the sewing. Have a great weekend everyone.


found this blog/pattern last week and immediately jumped on it!! My son had just turned 2 that week, so I was SO excited! Only planned on cutting everything out…but couldn’t stop….and by 12 that night I have completed the pants…and LOVED them! Lovely pattern…great tutorial….such a finished look…..
And then the next day: too small !!!!! noooooo…I could cry. I know I should have measured him first, but he was already in bed and I was impatient. Plus he is a regularly sized 2 yr old….But ja, cannot even close the button in front (did not even do the elastic waist, because I suspected that it would be on the smaller side….. Disappointed does not even begin to explain how I feel about this 🙁 Anybody looking for monogrammed skinnies?? (yes, I put his initials on it, so now I cannot even gift it…..)
how can i print these from my printer to make the patern
Hi Yoland. The pattern pieces are available to download here:
http://www.titchythreads.com/patterns/small_fry_skinny_jeans
The download also includes instructions for printing. The tutorial is here on my blog once you have the pieces 🙂