

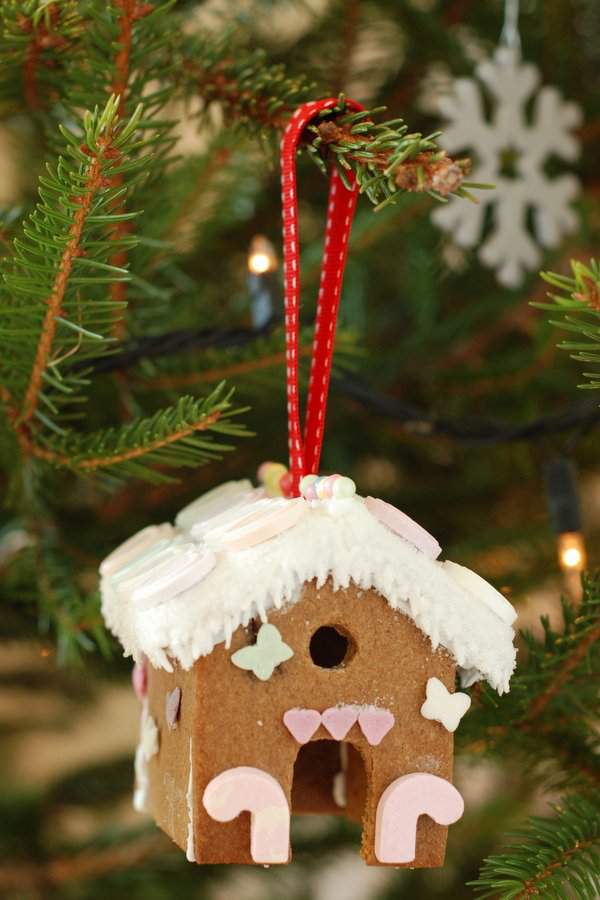
I love making gingerbread houses at this time of year but they can end up being quite time consuming. In an attempt to speed things up I decided to make some smaller ones this year. This meant that they were the ideal size to and try out an idea I had last year but never got around to. The ribbon is quite a simple addition but it gives you the option to hang your gingerbread houses as ornaments on the Christmas tree.
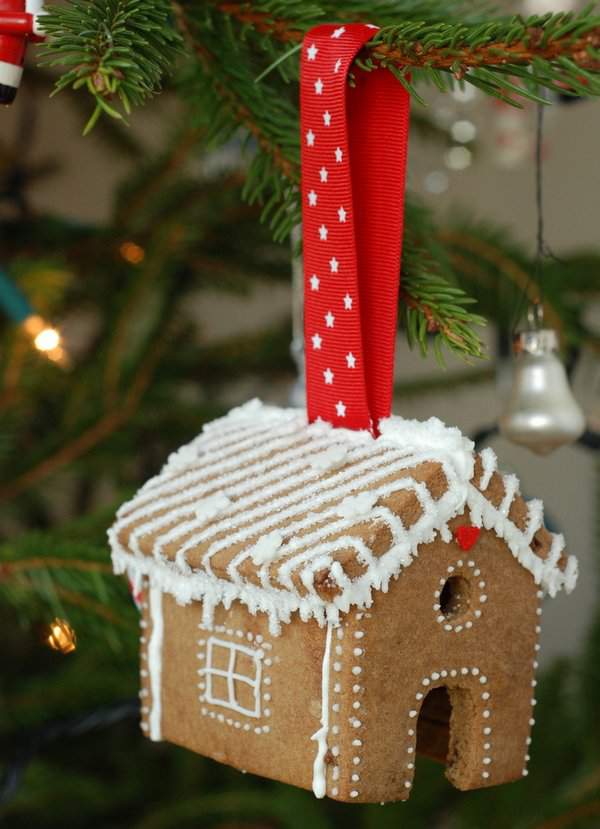
You do need to find quite a sturdy branch but they’re a fantastic decoration for the tree. Just make sure to hang them up high if you’ve got young children.
I’ve been searching for a new gingerbread recipe as the one I use for my snowman cookie snowglobes bakes quite unevenly. I tried this recipe provided by Marian from Sweetopia. I don’t think it’s necessary for me to repeat it here but I will mention that I used 180g each for the sugar and the molasses (the recipe uses cups for these two ingredients). It is definitely a more reliable recipe for cookies that need decorating but I do prefer the taste of the previous one so I may continue the search.
I’ve included a copy of the template I used – just cut out the shapes, place on top of your rolled out gingerbread dough and cut out with a sharp knife. You only need one of each shape but might find two helpful if you’re making more than one. I didn’t use the bases in the end to minimise weight. My houses were about 5cm wide, 7.5cm long and 7cm high but your final dimensions will depend on how thick your gingerbread is.

Once your gingerbread is cooked allow it to cool fully. While you’re waiting you can get your royal icing ready – I just use the royal icing sugar from Tate & Lyle but there are plenty of recipes to make it from scratch. For the construction of the house you need it to have a stiff consistency so it’s not at all runny. You may need to water it down later depending on the decorations you’ve got in mind. I started by building the walls, using a glass when necessary to keep them in place. Pipe lines onto the back of the front or back pieces and push the side into place. Once all four walls were up I left this for a couple of hours before putting the roof on. I attached one side of the roof before attaching the ribbon to the middle, again using royal icing. I then added the final section of the roof and left to dry overnight.
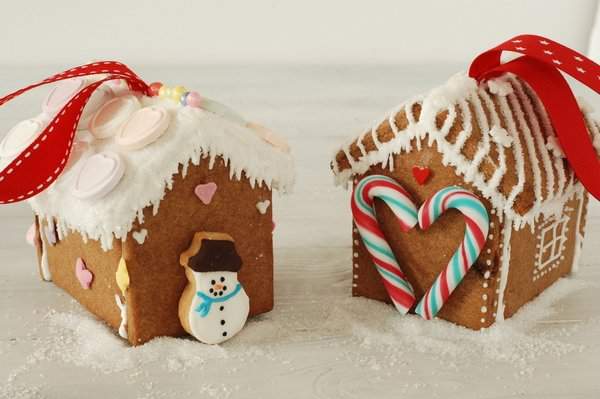
Finally you can start the decorating. If you have added the ribbon then you’ll need to decorate one side of the roof and give it time to set before moving the ribbon out of the way to decorate the other side. I opted for all pastel colours on the first house, with love hearts on the roof, butterflies fluttering around the house and liberal sprinkles of white sanding sugar. The second house has a more minimal design and a candy cane heart on the back. I love how they both turned out and I’m going to be keeping my eyes out for other sprinkles and sweets for next year. I’m not sure that two smaller houses are any quicker to make and decorate than one large one. It all comes down to how elaborate you want your decorating to be really as that is what takes the most time. It’s definitely the fun bit and I find it difficult to know when to stop. It helps to gather lots of different sprinkles and sweets to give you lots of options. I used a mini cookie leftover from the cookie advent calendars on each of the houses.
It would be also be fun to make one up for each of your children to decorate – I’m hoping we’ll still find time for that this week.


I saw some mini gingerbread houses that you can perch on the edge of a coffee mug and have been meaning to try them out. Now I’ve seen these I want to make yours instead – they’re so cute!
You come up wit the cutest things, Laura! You have decorated the little houses to look so charming; I love them! Thanks for the template; I hope I have time to get to them this week:)
I really do love these but after spending all weekend conducting my gingerbread house with the children I am now moving on to stained glass biscuits & peppermint cream & bark! They do look absolutely wonderful and I am bookmarking them. May even make an Easter version 🙂
Oh my word, these are gorgeous. I just cannot get over the fact that you make these! Happy Christmas! x
These are just darling!
Thanks so much Lora 🙂
Laura, you are either bonkers, or totally amazing:)
I want one myself!!!! Bloody fantastic stuff you baking guru:)
Nice blog re-design BTW xx
Hi Laura,
What a cute project! I love it so much that I decided to feature it in our roundup of gingerbread crafts! Check it out here: http://www.favecraftsblog.com/gingerbread-crafts-for-christmas
Have a great day!