
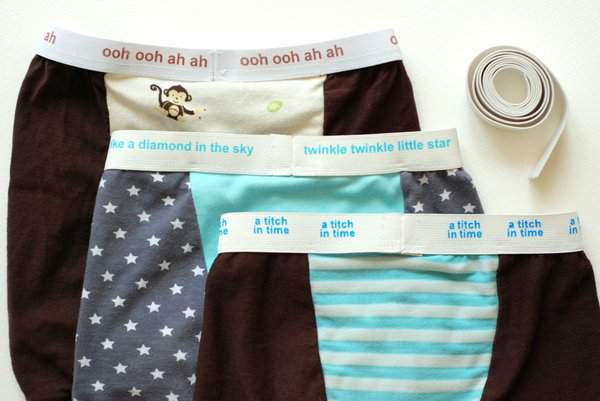
Hello! Well, I’m still here. I have been doing a lot of sewing recently but seemed unable to actually finish anything. Instead I would get close to finishing, lose focus and move on to another project. Does anyone else ever go through phases like that? I finally got my act together today and finished a few summer pyjama sets with embellished exposed elastic waistbands.
I’ve wanted to try customising elastic for a long time and I love how it turned out. My boys have a few sets of pyjamas with exposed elastic waistbands that have been branded in some way. All of these look really cosy and comfortable and I loved the idea of adding extra detail on the elastic. If you want to do this yourself then here’s how….
Method 1: Transfer Paper
I used this for the elastic on the monkey and the star shorts. It’s the best option if you don’t have a digital cutter. Originally I hadn’t considered this but I got the idea when Sophie of Cirque du Bebe raved about some transfer paper that was great on knits in her amazing guest post for Vintage May. After testing it I found that it works just as well on elastic as it does on T-shirts – the design shows up really clearly and stretches with the elastic. I used this transfer paper from Yolo but any transfer paper suitable for stretch fabrics should work. This method gives you infinite colour options (including using lots of colours within the one design) and is fairly quick and easy. It also doesn’t require a digital cutter. The only downside is that it leaves a visible residue when the ‘blank space’ of the design was, but this is barely noticeable.
Start by designing your text or images on the computer. You will need to use a graphics program that allows you to reverse your text or graphics. I used Inkscape, a free vector graphics program that I’d definitely recommend. I find it really easy to specify the exact text size I want and also to reverse it. A simpler alternative you could use is Microsoft Paint although you do not have so much control over text size.
1. Open a new document in Inkscape, selecting Default, A4 or A4 landscape size options.
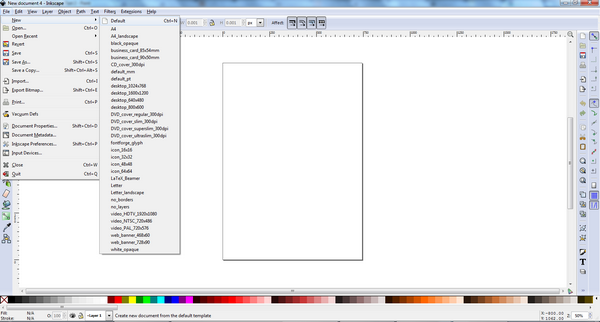
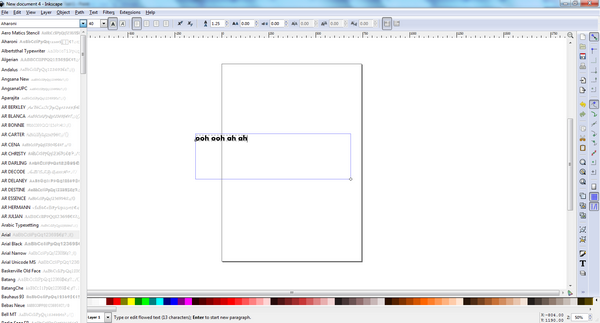
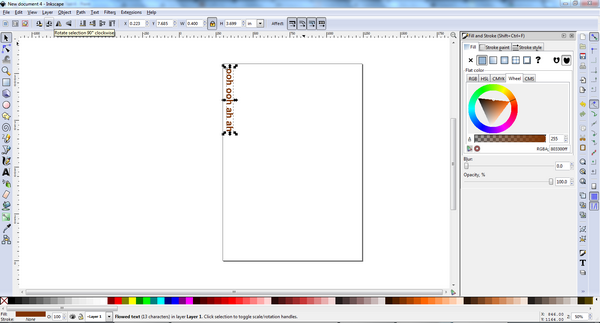
2. You will see a single ‘page’ in the middle of a white background. To print your design easily it should be contained within the page lines. I have highlighted the main tools you will be using in the picture below.

The Text tool is highlighted in green and the Selector tool in purple. The four buttons surrounded by red allow you to rotate you object (text or an image) 90 degrees anti-clockwise, 90 degrees clockwise, flip your object horizontally and flip it vertically. The boxes highighted in blue allow you to control the size and orientation of your object on a number of different scales.
3. Select the Text tool, draw a rectangular box anywhere on the screen and write whatever message you want to use. If you intend to repeat a few words then just write them once as we can ‘clone’ them later. You will be able to vary the font type and size at this stage using the drop down boxes at the top. If you can’t see all of your text within the box then you need to increase the size of the box.
Once you are happy click outside of the button with your left mouse button to exit the box.
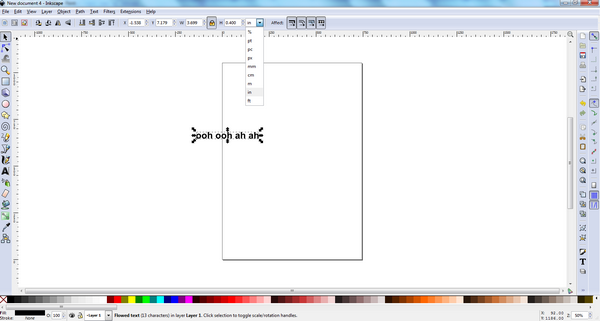
4. Select the Selector tool and click on your text object. Using the resize buttons select inches from the drop down menu. I click on the lock to close it in order to keep the text in the same proportions when I alter the height. Then choose the height of your text. I used 1 inch elastic and my text is around 0.3 of an inch high.
5. Change the colour by clicking on one of the preselected options below or select ‘Object’, then ‘Fill and Stroke’ for more control. Next, arrange your text on the page. The waistbands I cut were around 19″ before closing and I used a ½” seam allowance. Leaving around half an inch either size of the seam meant that I wanted my design to be around 17″ long. As A4 is 11.7″ high by 8.3″ wide this meant I wanted it to cover about one and a half lengths of the page or just over two widths. This is worth bearing in mind as it may affect the size you choose for your text.
I found it most useful to having it running down the page, so I rotated my text 90 degrees and arranged it at the top of the page.
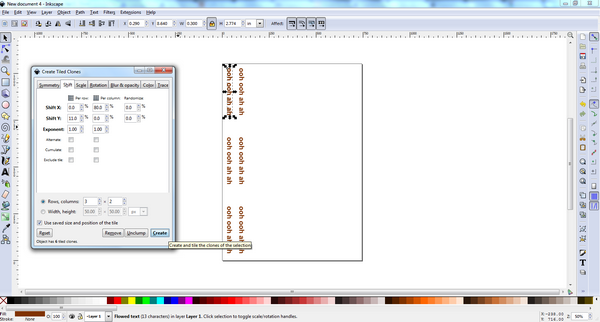
6. To clone your design select ‘Edit’, ‘Clone’ and ‘Create Tiled Clones’. This will bring up a pop up box in which you can select the number of rows and columns. I chose 3 rows and 2 columns. You may also want to play around with ‘Shift X’ per column and ‘Shift Y’ per row. This adjusts the space between your rows and columns as a percentage of the height and width of your text. Hit the ‘Create’ button after each adjustment to see how it affects the layout on the page. You can adjust the cloning as much as you want until you close the pop up box.
7. Once you have finished your design use the Selector tool to select all of it by holding the left mouse button and drawing around the whole of your design. Then you need to flip it (either horizonally or vertically) so the text appears backwards.
You are now ready to print it. It is worth thinking ahead and printing several designs at once, some of which you might use for T shirts, trousers or bags instead of elastic. Follow the instructions on your transfer paper to print and iron onto your elastic. I found it easiest to iron it on before I had sewn the seam on the waistband, so I could lie the elastic completely flat.
8. Sew onto anything with an exposed waistband.
Inkscape is very powerful program with a lot of functions but this part is fairly simple and, once you’ve used it a few times, you’ll be able to produce your designs pretty quickly.
Method 2: Heat Transfer Vinyl
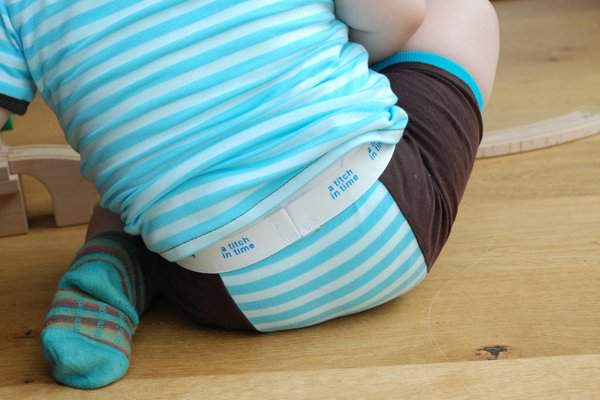
I used heat transfer for the elastic on shorts with the striped bum panel. And yes, I realise stitch is spelt wrong. I’ve been trying to think of a name for some clothing labels for a while now and this one finally came to me – titch is the first five letters of our surname. Anyway, the heat transfer worked just as well and also stretches. I bought the Pro Seal Verso heat transfer from Creative Transfers and it’s a huge improvement on the first batch I bought from ebay. I think the words are slightly more distinct compared to the transfer paper, particularly when the elastic is stretched, but otherwise I’d probably favour the transfer paper. You don’t need a digital cutter, it’s quicker to design, you have a lot more colour and font options and there’s no weeding.
I used Inkscape again to create the cutting file, then used Make The Cut software to cut it out. To create a cutting file (that will be svg format) start with the first 6 steps above then quickly follow the extra steps below. They don’t change the appearance of the file within Inkscape but do change how the cutting software reads it.
9. Use the Selector tool to select all of your design. Select ‘Path’, ‘Object to Path’.
10. Select ‘Object’, ‘Ungroup’.
11. Select ‘Path’, ‘Exclusion’.
12. Import into your cutting software. Cut your heat transfer and follow the instructions to iron onto the elastic.
One other method that might be worth trying is using stamps with fabric ink pads. I’ll be back soon to talk about the pyjama shorts as I drafted my own pattern for those. I hope you found this tutorial useful and might also create your own ‘branded’ elastic.
EDIT: The pattern is now available from the Titchy Threads website here. It has options for shorts or full length leggings with two different ankle finishes and two choices of waistband.
Linking to….
http://www.skiptomylou.org/
http://www.craft-o-maniac.com/
http://www.creatingreallyawesomefreethings.com/
http://www.mommybydaycrafterbynight.com/
http://www.sugarbeecrafts.com/
http://todayscreativeblog.net
http://tatertotsandjello.com/


This is very very cool. Love your work, Laura, love your work. Such a superb DIY…at first I thought you must have bought some elastic with the ready made phrases on it. And thanks for the mention too!
Thanks Sophie – for your lovely comment and for the transfer paper idea.
eeek! so awesome, what a fun idea to print on elastic! and thanks for the vintage may link. 🙂
Thanks Kristin, Vintage May was full of inspiration.
So this is what you’ve been up to?! Very cool! I think I’ll have to get some of that transfer paper…looks like a lot of fun. From the first pic, I thought you made the boys some cute underwear! Get tutorial for InkScape too. I downloaded it last night and need to start playing with it.
Cheers Abby. Cute underwear for the boys may well make an appearance soon. Any excuse for more exposed elastic waistbands really. I hope you get on well with Inkscape.
Would love to have (will watch for) your pj recipe – my boys are in need of some new, and I am often at a loss for what to sew for them, so these would be perfect!
What a great idea–TOO adorable!
What a clever idea! I just love that I can make up my own sayings and transfer them onto elastic bands…what fun!! Thanks so much for the inspiration. I have a new sewing machine- used only once- that is crying for some more attention. The grandkids will thank you too, I’m sure! 🙂
Hey Laura, its fantastic! i’m soo going to try it!
when will you be posting about the pajama shorts pattern? they looked so cute!! can’t wait haha
Oh my!! I LOVE this idea! Adorable, Laura!!
Hi – I know this is an old post but… I bought some of the papers you mentioned to use on elastic exactly like in your post… but my iron (just a regular home hand iron) burnt the paper, melted the elastic and the whole thing melted into my ironing board! How did you iron it on?
Hi Kayleigh, I’m really pleased to hear you’ve tried this. I pretty much just followed the instructions on my paper. Did you use a protective sheet to cover the iron on paper? I always do this – if one didn’t come with the paper itself then you can use baking paper. Also, I use a low iron with no steam. Sorry to hear you’re having trouble, I hope this helps.
What a great idea! I have a ton of great waistband elastic in different colors but I never thought about customizing it! Thanks for the awesome idea!
What a friggin great idea!
THANK YOU SO MUCH! I’ve been searching literally all over the internet for a post like this!